 Talli
Docs / Venues and layouts
Floor plans and layouts
A layout is how one room of a venue is set up: the stage and rows for a seminar, the booths of an expo, the registration desk and the signs. Talli checks each layout for aisles, clear exits, a step-free route, a language help sign at registration and power for booths, and prints a setup sheet for the venue crew. Layouts belong to the venue, so every event held there can use them.
Create a layout
A layout is drawn inside a room on the venue's plan, so place the room on the plan first (see Venues).
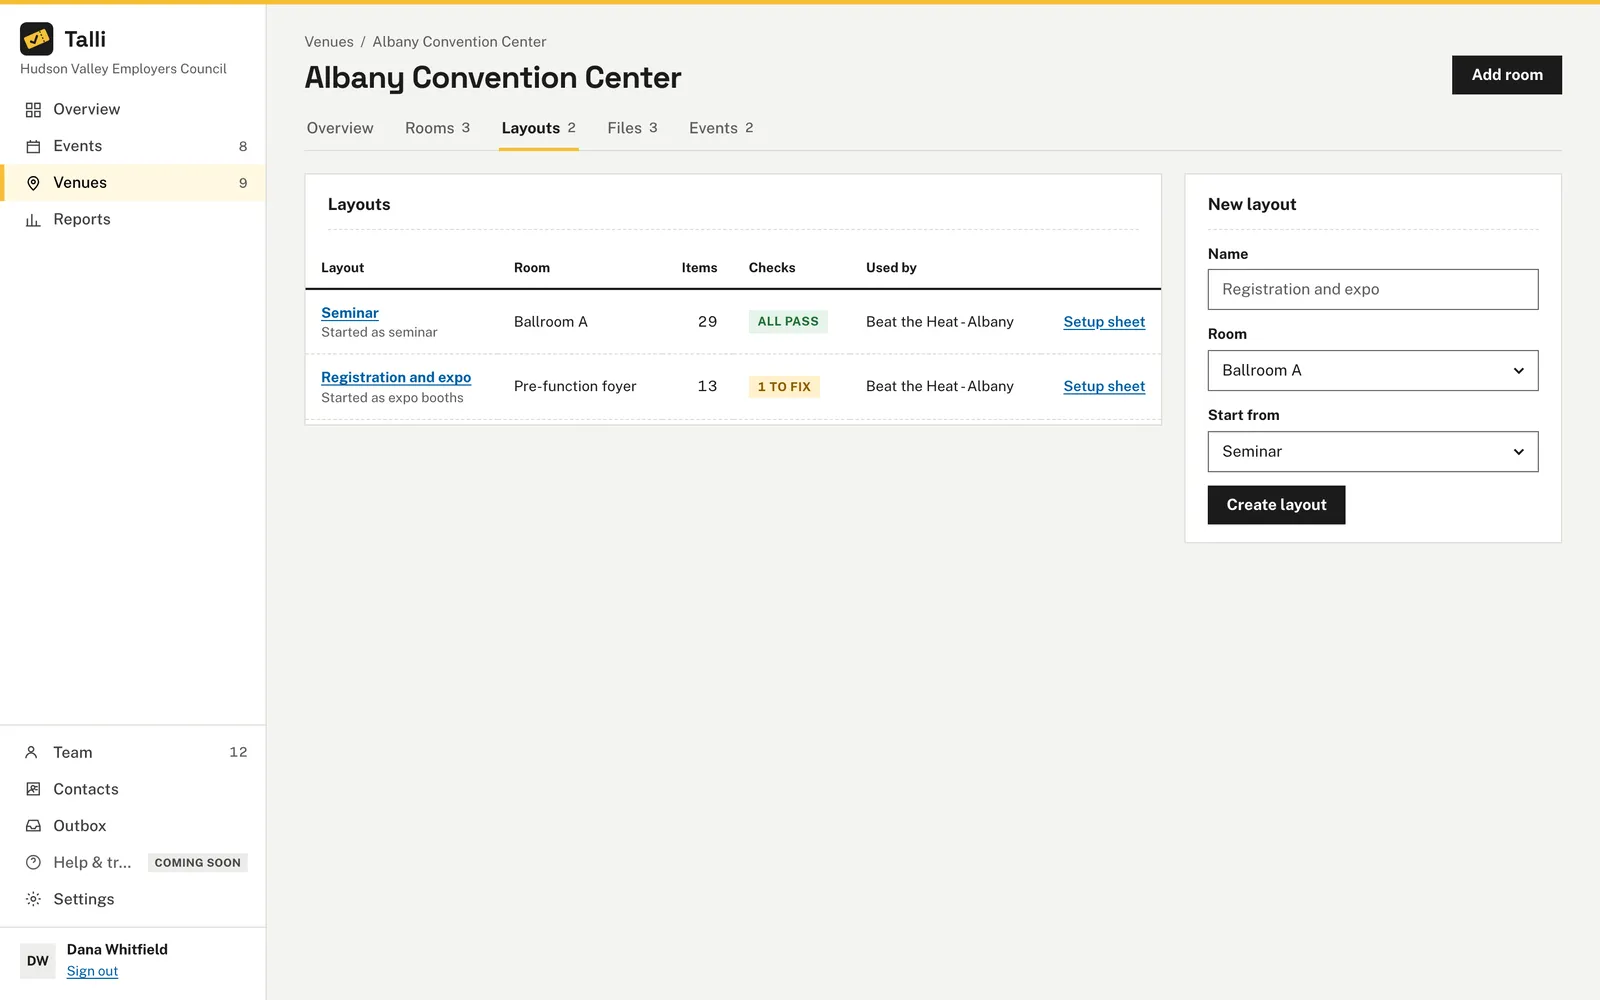
- Open an event and choose Floor plan in the left sidebar, or open a venue and choose its Layouts tab.
- Under New layout, enter a Name, for example "Registration and expo".
- Choose the Room.
- Choose where to Start from:
- Seminar: a stage, classroom rows facing it with a center aisle, and accessible seating.
- Classroom: the same rows without the stage.
- Rounds of 8: round tables for 8.
- Expo booths: 10 x 10 booths in rows with 10 ft aisles.
- Empty room, or a copy of another layout of the venue.
- Choose Create layout. The layout opens in the editor. Created from an event's Floor plan page, the event uses it straight away.
The preset keeps the room's doors clear.
Create an expo booths layout called Registration and expo in the foyer of Lakeside Training Center, and have the Spring Safety Seminar use it.Select the prompt and copy it into Claude or ChatGPT connected to Talli. Uses list_venues, list_rooms, create_layout. Connect an assistant
Edit a layout
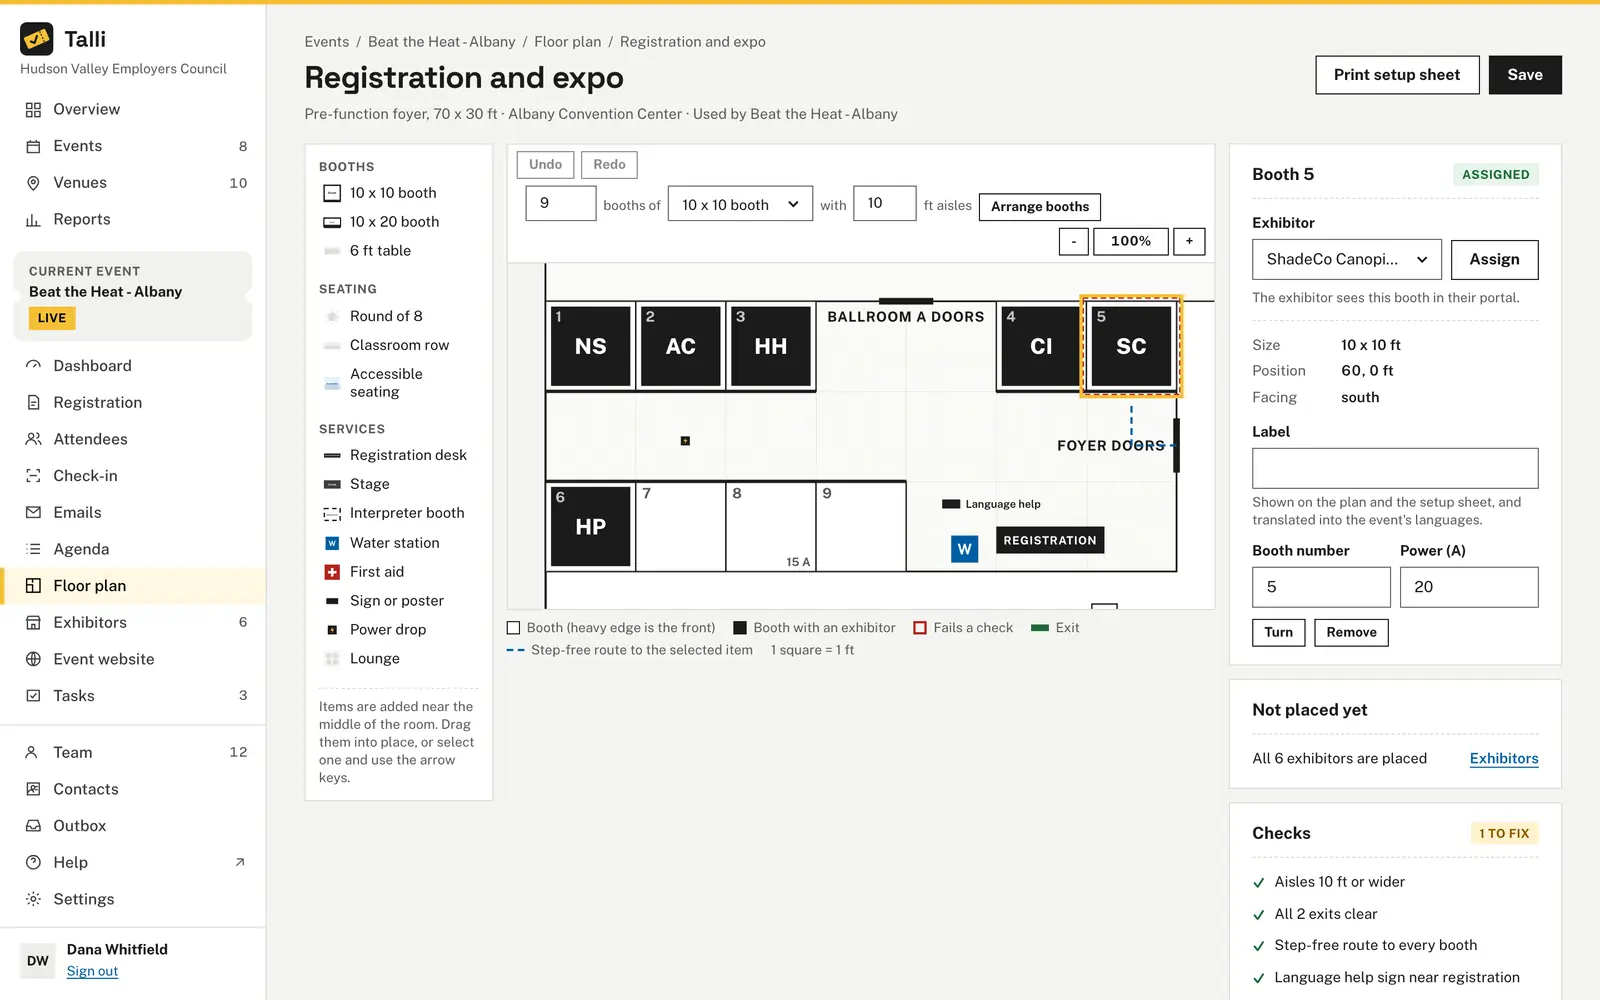
The editor shows the room with its walls and doors, the items, and a 1 ft grid.
- Add an item: choose it on the left (booths, seating, services such as a registration desk, interpreter booth, water station, first aid, signs and power drops). It is placed near the middle of the room.
- Move an item: drag it, or select it and use the arrow keys. Items snap to whole feet; an arrow key moves 1 ft, with Shift 5 ft.
- Turn an item: press R, or choose Turn in the Selected item panel. A booth's heavy edge is its open front.
- Remove an item: press Delete, or choose Remove.
- Undo and redo: Undo and Redo above the plan, or Control Z and Control Shift Z. The last 50 changes can be undone.
- Zoom: - and + go from 50% to 200%; the percentage button resets the view. Drag the empty floor to pan.
In the Selected item panel you can give an item a Label (for example "Registration" or "Language help"), a Booth number and the Power (A) a booth needs. Labels are shown on the plan and the setup sheet, and translated into the event's languages like the rest of its text.
Choose Save to keep your changes. Talli warns you before you leave the page with changes not saved.
Edit as a list
Under Edit as a list every item is a row with its kind, position in the room and turn. Tick Remove on a row to take the item out when you save. It works without scripts running in the browser too: change the numbers and choose Save, or choose an item on the left to add it and save.
Arrange booths
Above the plan, enter how many booths, their size and the aisle width, then choose Arrange booths. Talli proposes rows along the room's longest wall, centered, with the doors kept clear and every other item left where it is. The proposal is drawn over the plan and nothing changes until you choose Apply (then Save), or Discard. When the room cannot hold them all, Talli says how many fit.
In the Registration and expo layout, arrange 12 booths of 10 x 10 with 10 ft aisles. Show me the arrangement and its checks before saving anything.Select the prompt and copy it into Claude or ChatGPT connected to Talli. Uses arrange_booths, get_layout_checks, save_layout_items. Connect an assistant
Checks
The Checks panel updates as you edit:
- Aisles: 10 ft between facing booth rows, 5 ft between rows of seating.
- Exits clear: 5 ft kept clear in front of every exit and entrance.
- Step-free route: a route at least 3 ft wide from a step-free entrance to the front of every booth and to accessible seating.
- Language help sign near registration: a sign labelled for language help (for example "Language help" or "I speak") within 15 ft of each registration desk.
- Power for booths: every booth that needs a circuit has a power drop within 30 ft.
A failing check names the items, for example "Booth 2 and Booth 7 are 7 ft apart; aisles between booths need 10 ft.", and marks them on the plan with a dashed red outline. Choose Show to select the first one. Selecting a booth draws its step-free route. Checks are a warning, not a block: you can save a layout that fails one.
Which checks does the Registration and expo layout fail, and what would fix them?Select the prompt and copy it into Claude or ChatGPT connected to Talli. Uses get_layout, get_layout_checks. Connect an assistant
Use a layout for an event
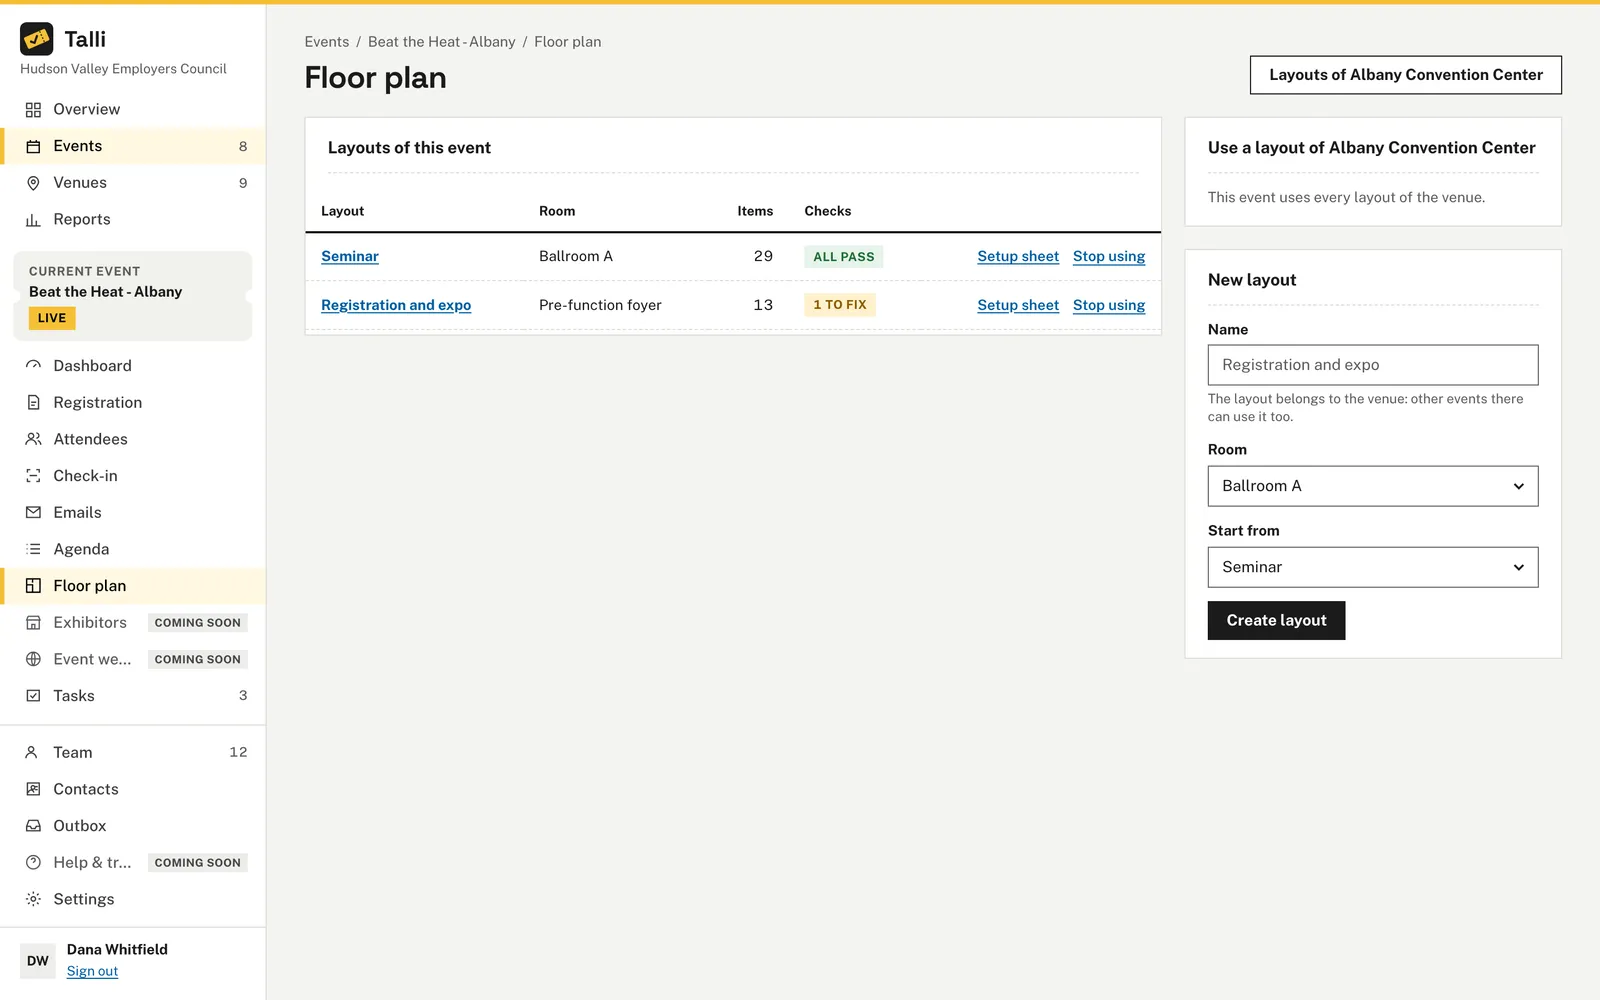
An event's Floor plan page lists the layouts it uses, with their room, number of items and checks.
- To use another layout of the venue, choose it under Use a layout of the venue and choose Use layout.
- To stop using one, choose Stop using. The layout stays with the venue.
An event can use several layouts, for example a seminar in the ballroom and registration and an expo in the foyer.
Give booths to exhibitors
Open a layout from an event's Floor plan page to give its booths to the event's exhibitors. Select a booth, choose the Exhibitor in the Selected item panel and choose Assign; choose Open (no exhibitor) to take it away. A booth with an exhibitor is filled dark with the brand's initials, and Not placed yet lists the exhibitors without a booth. Save a new booth before you give it to someone.
Print the setup sheet
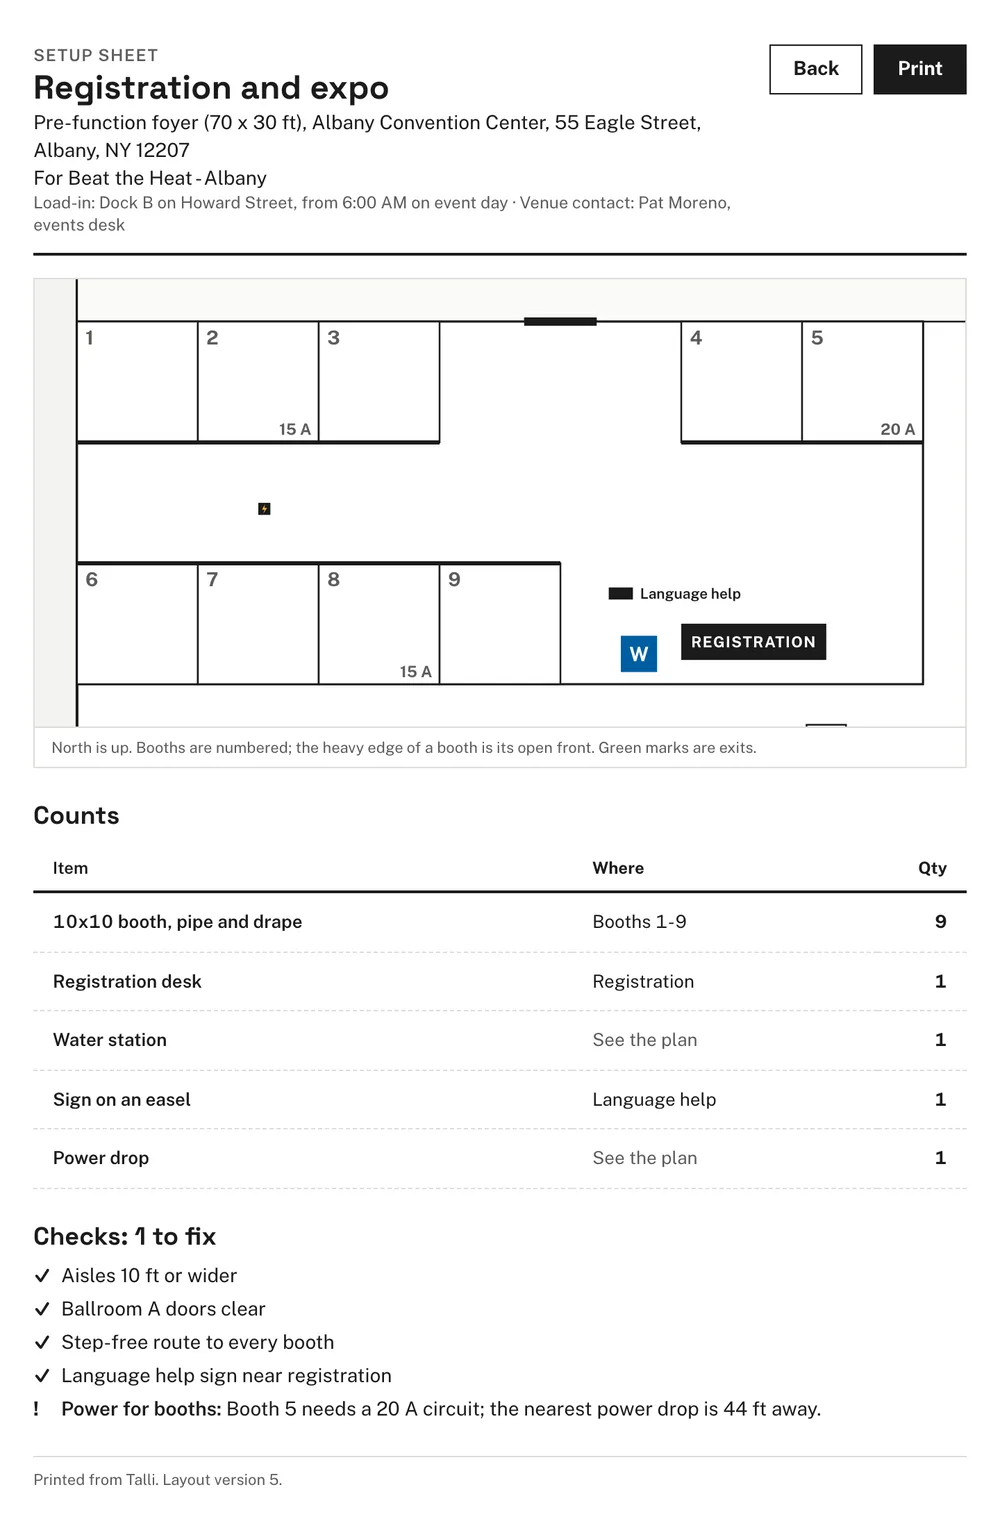
Choose Print setup sheet in the editor, or Setup sheet in a list of layouts. The sheet fits US letter paper in black and white: the room drawn with every item, the counts for the venue (each kind of item with its quantity and where it goes, plus chairs), and the checks. Choose Print; the buttons are left off the paper. To print the sheets of every layout an event uses at once, see Venue map and signs.
Who can use it
Owners and admins create, edit and arrange layouts and choose which an event uses. Staff see the layouts, their checks and the setup sheets, but cannot change them.
Limits and edge cases
- A layout holds up to 600 items, and Talli arranges up to 500 booths at once.
- Every item must be inside the layout's room, and an item cannot be turned except in quarter turns.
- A room used by a layout cannot be removed from the venue; move or delete its layouts first.
- A booth with an exhibitor cannot be removed, and the event cannot stop using its layout, until the exhibitor is moved to another booth or the booth is opened (see Exhibitors).
- If someone else saved the same layout after you opened it, your save is refused with "Someone else saved this layout" and Reload shows their version, so nobody's changes are lost without notice.
- When you clone an event to the same venue, the copy uses the same layouts; a copy at another venue uses none. To give copies at other venues the same setup, see One layout across a series.
Coming soon
- Drawing a route between two points by hand, and measuring.
From an AI assistant
list_layoutswith{ venueId }or{ eventId }: the venue's layouts with their room, preset, number of items, version and the events using them; witheventId,usedByEventsays whether that event uses each one.get_layoutwith{ layoutId }: one layout with its room, every item (in feet on the venue plan), its version and its checks.create_layoutwith{ venueId, roomId, name }and optionallypreset(seminar,classroom,rounds,expoorcustom) orcopyOf(owners and admins). PasseventIdof an event at the venue to have it use the new layout in the same write.save_layout_itemswith{ layoutId, items, expectedVersion }(owners and admins): every item of the layout, each withkind,xandy, and optionallyid,w,h,rotation,label,boothNumber,seats,powerAmpsandstepFree. A save over a newer version is refused with conflict: callget_layoutagain.arrange_boothswith{ layoutId, count, boothKind, aisleFt }and optionallyitems: a booth arrangement to show the person; it saves nothing. Save it withsave_layout_itemsonce they agree.get_layout_checkswith{ layoutId }and optionallyitems: the checks of the saved layout or of unsaved items.use_layout_for_eventwith{ eventId, layoutId }(owners and admins); passuse: falseto stop using it.get_setup_sheetwith{ layoutId }: the counts and checks the printed setup sheet shows.
Find venueId with list_venues, roomId with list_rooms and eventId with find_events. Every change is recorded in the activity log.