 Talli
Docs / Planning and websites
Event website
Every event can have its own one-page website, built from sections you put in order: a header, a hero with a register button, your own text, the agenda, speakers, the venue map, exhibitors, questions and answers, and a footer. You edit a draft, look at it as a desktop or a phone, and publish it when it is ready; attendees then read it in their own language at its own web address.
Open the website editor
- Open the event and choose Event website in the left sidebar.
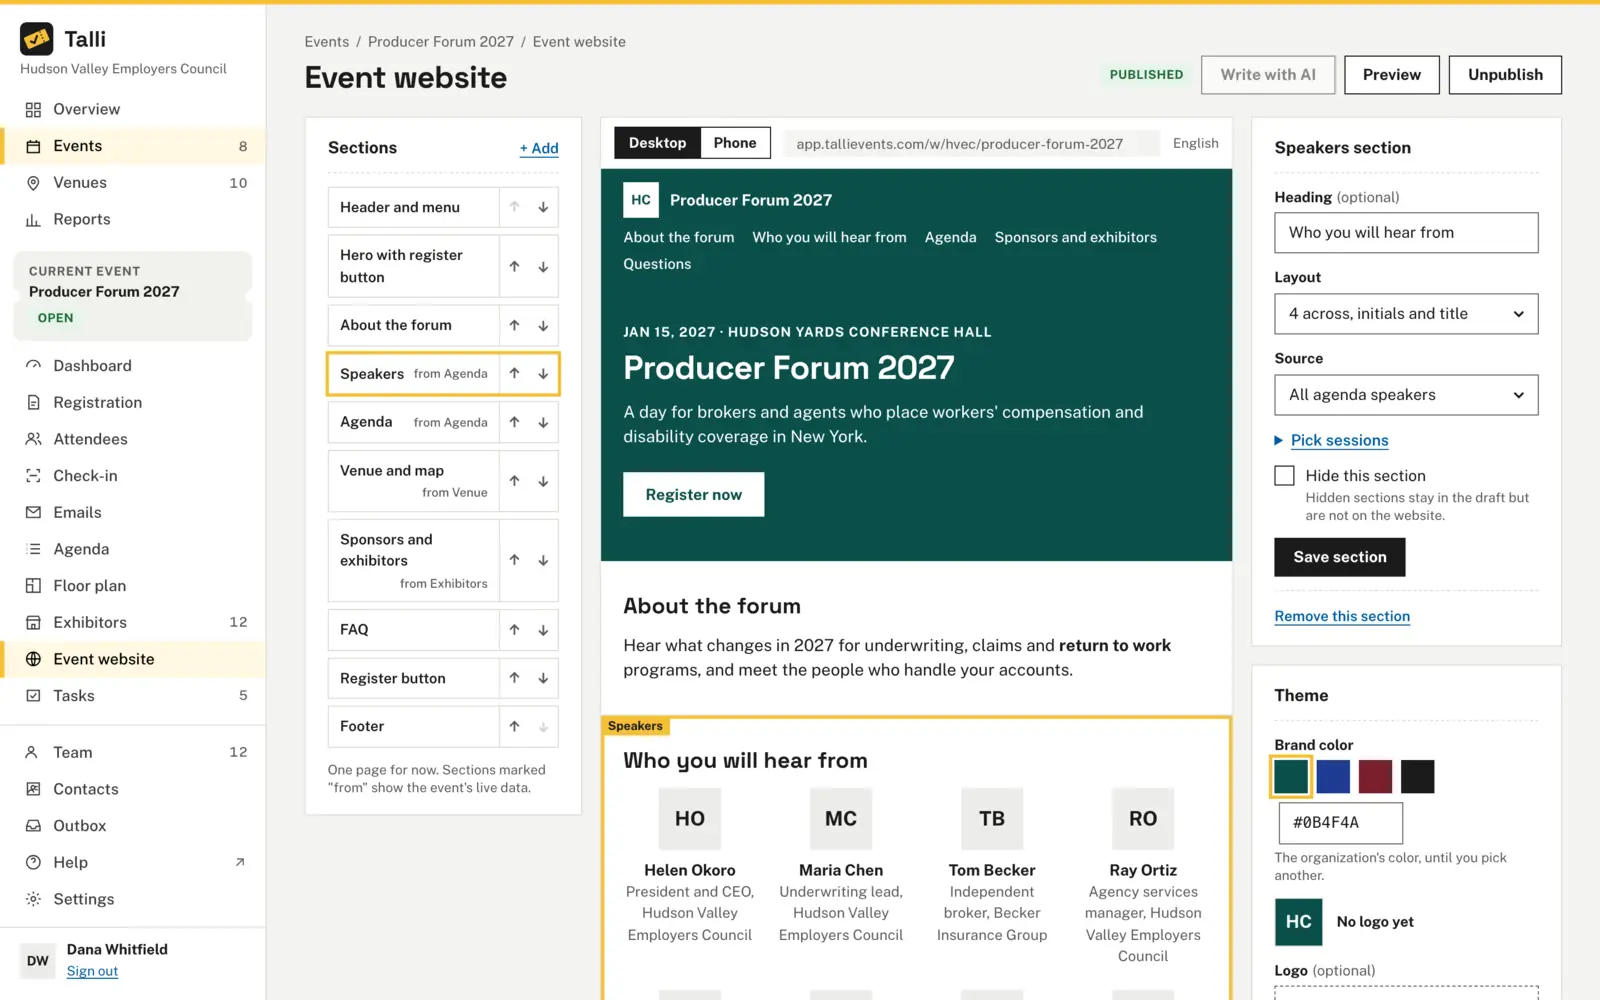
- On the left, Sections lists the page's sections in order.
- In the middle, the preview shows the draft as attendees will see it, with the chosen section outlined in yellow.
- On the right are the chosen section's fields and the Theme.
A new event starts with ready-made sections filled from the event: the title, the first paragraph of the description in the hero, the rest of the description under About the event, the agenda, speakers, venue and map, sponsors and exhibitors, a hidden FAQ, a register button and a footer. Nothing is saved until you change something, and nothing is public until you publish.
The status next to the page title says where the website stands:
- Not published: attendees cannot open the website yet.
- Draft changes: the website is published, and the draft has changes attendees do not see yet.
- Published: attendees see exactly the draft.
Edit a section
- Choose a section in Sections.
- Change its fields on the right.
- Choose Save section. The preview updates, and the change waits in the draft until you publish.
What each section has:
- Header and menu: the site name next to the logo (empty means the organization's name), and a menu that links to each section with a heading.
- Hero with register button: the headline (empty means the event's title), a subheading and the button label (empty means "Register now"). The date and venue always come from the event.
- Text: a heading and text in short Markdown: bold, *italic*, links and lists.
- Agenda: the event's sessions by time, with rooms and speakers.
- Speakers: every speaker of the agenda, or only those of the sessions you pick. To pick, set Source to Speakers of the sessions picked below and tick the sessions; with All agenda speakers, the list stays folded under Pick sessions. Choose 4 across, initials and title or List with bios.
- Venue and map: the venue's name and address, and a button to the venue map.
- Sponsors and exhibitors: the event's exhibitors by level (gold, then silver, then exhibitors), with their booth.
- FAQ: questions and answers; answers can use short Markdown. Leave a question and its answer empty to remove that pair.
- Register button: a heading, a short text and the button label.
- Footer: a line of your own, for example who to contact. The copyright line and the language links are added for you.
Sections marked "from" in the list show the event's live data: a session added to the agenda, or a new exhibitor, shows on the website at once, with no need to publish again. An empty heading shows Talli's own wording, in the visitor's language.
Add, move, hide or remove a section
- To add one, choose + Add, pick the kind of section and choose Add section. It goes below the chosen section.
- To move one, choose its up or down arrow in Sections.
- To hide one without losing it, tick Hide this section and save. Hidden sections stay in the draft and say Hidden in the list.
- To remove one, choose Remove this section below its fields.
The header and footer are not in the + Add list, so hide them rather than remove them if you may want them back.
Write the text with AI
- Choose the hero, a text section or the register button.
- Choose Write with AI.
- Say what the section should say and for whom, and pick a tone and reading level.
- Choose Write draft. The date, time, venue and capacity come from the event; any date, time, amount or number that is not in the event's details is flagged for you to check.
- Choose Keep all, or keep each part on its own. Kept text goes into the draft like any other change.
See Write with AI for how the drafts and warnings work. Write with AI is not offered for sections that show the event's live data.
Choose the colors and logo
- Under Theme, pick a Brand color swatch or type one as
#and six hex digits. The website uses the organization's color until you pick another. - Under Logo, drop a PNG, JPEG or SVG file of up to 1 MB, or tick Use the organization's logo to go back to it.
- Choose Save theme.
Like the organization's color, the website's color must keep white text readable: at least 4.5 to 1 contrast, the WCAG 2.1 AA standard. A color that fails is refused with the reason (see Organization settings and branding). Theme changes also wait in the draft until you publish.
Preview as a desktop or a phone
- Above the preview, choose Desktop or Phone. Phone shows the page 390 pixels wide, as on most phones.
- Choose Preview at the top to open the draft as a full page; Back to the editor returns. It says "Preview of the draft." and is never shown to attendees or search engines.
The preview shows the draft in the event's main language; translations are made when you publish.
Publish or unpublish
- Choose Publish.
- Read the confirmation and choose Publish again. Attendees see the draft at the website's address, and its text is translated into the event's languages.
If someone saves the draft between the moment you open the confirmation and the moment you confirm, nothing is published and the page says "The draft changed since you looked at it, so it was not published. Review the draft again, then publish." This way you only ever publish a draft you have seen.
To take the website down, choose Unpublish and confirm. Its address then answers "Page not found"; the draft is kept and the event's registration page is not affected.
The web address is shown under Theme as Web address, ending in /w/your-organization/your-event, with a button to copy it.
What attendees see
- The published sections in order, in the organization's or the website's colors and logo.
- Register now buttons that open the event's registration page in the same language.
- A language menu in the header, and "This page in:" links in the footer that work without scripts.
- The website's text in the attendee's language once it is translated, marked "Translated automatically." until someone reviews it, with a link to the original.
- A layout that fits phones, with no sideways scrolling, and works with a keyboard and a screen reader.
Who can use it
Owners and admins edit, publish and unpublish the website. Staff can open the editor and the preview to see the draft, but cannot change or publish it. Anyone with the link can read a published website; it needs no account.
Limits and edge cases
- The website is public only while the event is published or closed; for a draft or cancelled event its address answers "Page not found". A cancelled event's website cannot be published.
- Publishing a draft event's website is allowed, and it goes live when the event is published.
- The website never shows attendees, registrations or anything about who is coming.
- Exhibitors are listed only while Show exhibitors on the event website is on for the event (see Exhibitors), and an exhibitor links to its booth page only once you approve the page.
- Venue and map shows only when the event has a venue map: the venue has rooms on its plan and the event uses a layout in one of them. Until then the editor's preview says so and attendees see nothing.
- Sections with nothing to show (no speakers yet, an FAQ with no questions) are left out for attendees.
- Text and answers are shown as plain text or short Markdown; HTML and scripts are never run, and links only open web and email addresses.
- At most 40 sections, 30 FAQ questions, 120 characters per heading, 5,000 characters per text section and 2,000 per FAQ answer.
- If someone else saved the website while you were editing, your save is refused with "Someone else changed this website since you opened it. Reload to see their changes.", so nobody's changes are lost.
- Only the published text is translated, and it is listed under Languages and translation as Event website, where it can be reviewed and corrected. A changed text is translated again when you publish.
- When you clone an event, the copy gets the website's draft and theme, unpublished; sections that picked sessions keep the copies of those sessions. A site name or headline that was the event's title becomes the copy's title.
- A replaced or removed website logo is deleted once attendees no longer see it either.
- Every save, publish and unpublish is in the activity log.
Coming soon
- More than one page per website.
- Your own domain for the website, for example
forum.your-organization.org.
From an AI assistant
get_websitewith{ eventId }: the draft sections and theme, the published sections,publishedAt,hasChanges, the public address (publicPath), the event's live data the sections show, andupdatedAt.update_website_draftwith{ eventId }andsections(every section in order, each{ id, kind, props, hidden }) and/ortheme({ brandColor, logoKey }), plusbaseUpdatedAtfromget_website(owners and admins). Kinds areheader,hero,text,agenda,speakers,venue_map,exhibitors,faq,register_ctaandfooter; a prop a kind does not have is refused.draft_website_with_aiwith{ eventId, prompt }and optionallytone,readingLevelandsectionIds(up to 6 hero, text and register_cta sections): proposed sections with warnings. It saves nothing; keep a proposal withupdate_website_draft.publish_websitewith{ eventId }andbaseUpdatedAt(theupdatedAtfromget_websiteof the draft the person reviewed; owners and admins): asks the person to confirm, then publishes the draft and translates it. If the draft was saved again before the person confirms, it is refused as a conflict, so they can review it first.unpublish_websitewith{ eventId }(owners and admins): asks the person to confirm, then takes the website down and keeps the draft.